|
Transmission Meets Engine.......again!
There's been a lot of references
to "we" throughout this project so it's time to meet the other
half of the heavy lifting team. Al Gary lives about 20 miles
away and has made about 5 or 6 trips down to help me
out.............I needed a gear head to hold my hand and Al was
the guy. You can see Al's sweet ride here
http://www.triumphowners.com/1254 and here's the man
himself!
|
Al Gary & his tri-carb
TR6! |
 |
 |
Enough about Al......let's get
back to me! We did this assembly once already when the engine
was out of the car. We got it all mated up and then installed the engine and
tranny as a unit. Bled the clutch, pumped the pedal and watched brake fluid drip
from the bottom of the bell housing due to a bad t/o bearing.
But this time everything has been tested so we know there won't
be any leaks.
|
We really do nice
work...... slide right in & bolted right up. Too bad we had to pull
the tranny
a week later when the t/o bearing sprung a leak! |
 |
Attaching the tranny to the
engine when everything is out of the car is pretty easy to accomplish. Doing
it when then engine is already in the car can be a bit tricky to get it all
lined up correctly. I've heard horror stories of people warping their brand
new clutch by hanging the tranny nose on the clutch while lining it all up.
And you don't discover that problem until you're back on the road. I had read
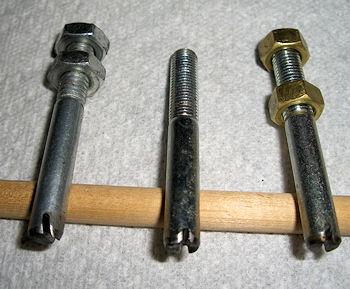
about various techniques and decided to make up some 3" guides to support
the tranny while we worked it in place. I had some 5/16" bolts that were 4"
long and had a nice long shoulder on them. I cut the heads off and then cut
a screwdriver slot in the end,
| Oops..... brush a
little grease on the tranny spline |
Remember these? 3" of
smooth shoulder |
 |
 |
| Here's where they went |
Top one screws in |
 |
 |
The bottom
two are bolted in place. Once you get the tranny up against the nut,
you remove the nut
behind the backing plate and then unscrew the bolt from the nut
between the plate & the tranny. |
 |
 |
It was kind of scary how easily
the tranny slide into place. We had a bottle jack supporting the engine and
my differential jack supporting the tranny. I
got to lie under the car and guide it while Al Gary (my new best TR6 friend)
worked from above. We had the tranny in 5th gear so he could turn the rear
flange and feel for the nose slipping into the clutch. The bolts I had made
up did a great job of supporting all the weight as we maneuvered it into
place. We locked it together with a few bolts, removed the jacks, removed my
support bolts and installed the rest of the bell housing and starter bolts.
Finishing the tranny............... |


