|
Adjustable Trailing Arm Kit
First my story about how I came to
own these $120 brackets........last summer I was washing the TR6
in the driveway when a truck pulled in and guy introduces
himself as living on one of the cul-de-sacs off of my street. He
had a TR6 that he sold a few years ago as it was too small for a
big guy like him. Prior to selling the car, he had bought this
kit and never got around to installing it and was about to toss
it in the garbage when he remembered another TR6 in the area.
And would I like the kit.....for free :-)
Richard Good,
Goodparts.com, produces a varied assortment of high
performance products for the TR6 including a kit which makes it
very easy to adjust the camber on the rear suspension. The TR6
is known for the negative camber that gives it the "squatting"
look. Up until now adjustments were made by following around
with an assortment of Brackets/shims to get the result you were
hoping for. With the Goodparts' kit, you turn the adjuster bolt
with one turn equaling about 1/4 degree of camber. Basically,
you replace the old trailing arm brackets with the new
adjustable ones.
Here's the
directions that Richard emailed me.
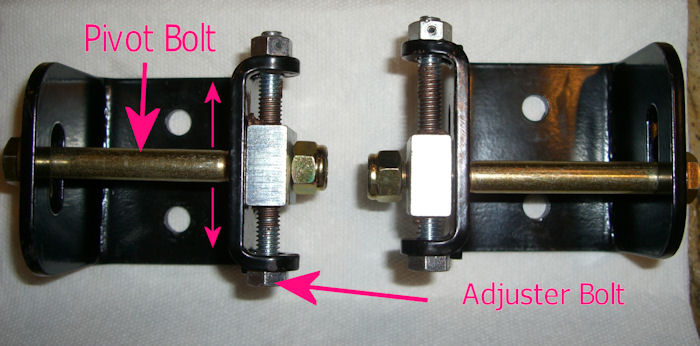
| The inner bracket (on
the right) starts with the adjuster bottomed out
while the outer bracket (on the left) starts with it
about in the middle. That's anti-seize on the
adjuster bolt threads. |
|
 |
I wish I could say these dropped
right in but I ended up with a bolt length problem. The grade 8
bolts that come with the kit are a fine threaded 3/8" x 3"
hex bolt. It was quickly apparent that a 3" bolt wouldn't work
for me. (NOTE: Richard has told me that the kits
now come with a 3-1/4" bolt and that I must have been given one
of the very early kits.) I could catch the nut on the bolt head but couldn't
tighten it down enough to engage the nylon part of the nyloc
nut. A combination of shims needed between the bracket and the
frame AND previous frame repair work meant I needed a 3-1/2"
bolt. However, no one in my area carries this type bolt in a
3-1/2" size. Every hardware store went from a 3" size to a
4" size. Good old McMaster-Carr should have what I need
delivered tomorrow.
The 3-1/2" bolts were perfect for
me and I'm not sure if the 3-1/4" would have been long enough at
all four locations. As usual one side hooked up perfectly while
the other side was more of a struggle. I loosely attached the
brackets on the passenger side and did a test fit of the
trailing arm, removed it and tightened the bracket bolts with my
torque wrench. I can only get the torque wrench on the bolt head
side do to space limitations on the nut side. Once I got it all
tightened down I put the passenger arm back on with no problem.
So..................I did the same thing on the driver side only
this time I couldn't get the arm back on with the bracket
tightened down. I had to loosen that bracket and then install
the trailing arm which means I won't be able to get my torque
wrench on all four bolts.
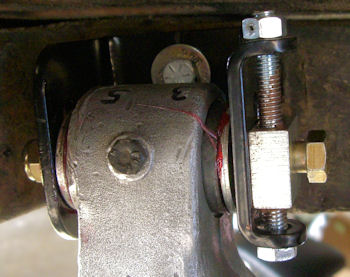
One thing you'll notice on my
bracket installation is the direction that the pivot bolts are
installed. The Goodparts' directions follow the factory manual
of installing the pivot bolts in the opposite direction so that
they can't fall out should the nuts work loose and come off.
Seeing as I'm using new nyloc nuts and can easily check them for
tightness, I opted for the easier way of pivot bolt installation
with the bolt heads on the inside looking at each other. I also
checked with the folks on the Triumph and 6-Pack Mail Lists and
they all agreed that they way I'm doing it shouldn't be a
problem.
|
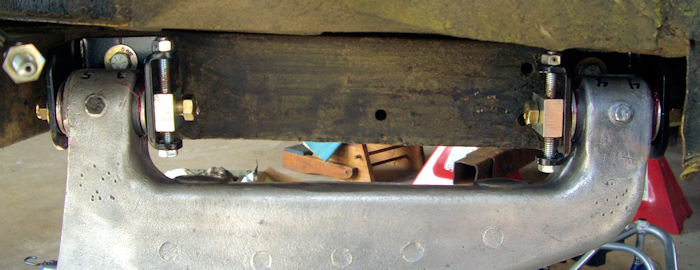
The
troublesome driver side all installed and hanging
down |
 |
|
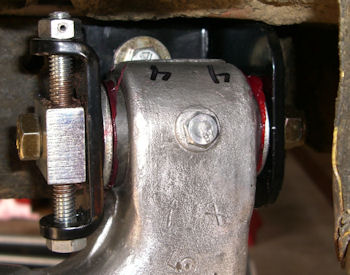
Up
close and personal |
 |
 |
For now everything stays loose
until I can put the car back on all 4 wheels and let the
suspension settle and see what the camber looks like. Then the
adjustments can begin.
So how do you adjust camber
with the kit..............
|


