|
Uncle Jack's Stub Axles
Jack Drews and his son Tony have been racing Triumphs for
quite some time and, as a result, have come up a number of improvements to stock
parts that have a tendency to break or under-perform during race conditions. A
visit to their web site (http://www.tonydrews.com/)
will find a link to Jack's Parts and the cool stuff he makes & sells. Make sure you
check out their videos, especially the one called "Old Blue's Demise" where an
axle breaks, causing their car to flip during a race.
This was my winter (2007) of major projects including: converting the
car to Throttle Body Injection (TBI), properly wrapping my Dan Master's wire
harness with harness tape (back breaking job) and rebuilding my front suspension
(a first for me). Seeing as I'd have the front end apart, what better time to
replace the stub axles too? And if I'm replacing them, I might as well upgrade
them to Jack's kit. Rather then bore you with the details of the benefits of the
kit, you can read all about it on the
TRF web
site. I bought the axles directly from Jack and the Timken bearings from
TRF. I emailed Jack and told him that I wanted to purchase his axles, so he took
my address and shipped them to me before I even had a chance to get him a check!
I've never met Jack or even talked to him before. I only know him through the
Triumph Mail List, so I guess I'm a trustworthy contributor to the List and he
knew I was good for the money :-)
One of my concerns was about removing the old stub axles which
have been in the car forever. Jack assured me that good whack with a BFH (Big
F@&#ing Hammer) would solve the problem........and he was right. And the hammer
wasn't even that big!
The first thing you'll notice is the cool wrapper it ships in.
It reminds me of those old Chinese Finger Torture toys that us old guys had when
we were kids. Then when you compare the original/stock axle to Jack's you'll see and feel the
heft of it.....it's thicker, but he supplies the proper size nyloc nut for the
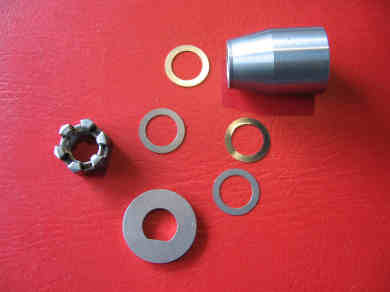
back and castle nut for the front. The kit ships with: 2 axles, 2 spacers, 2
Grade 8 nyloc nuts, 2 D washers, 2 castle nuts and 12 shims - 2 each @ .015,
.010, .007, .005, .002 & .001.
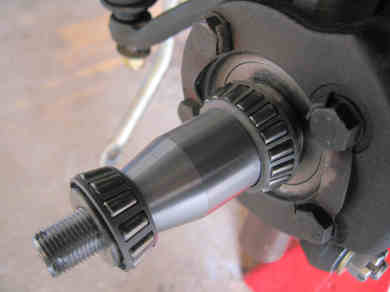
| Spacer, Some of the Shims, D Washer & Castle Nut |
New Nuts & Washers on left give an idea of larger
axle size. Stock size is on right |
 |
|
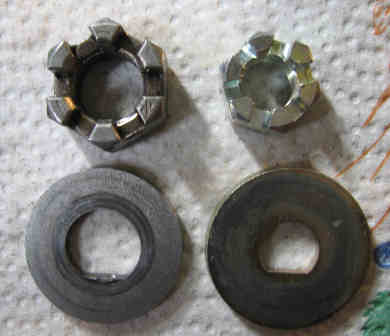 |
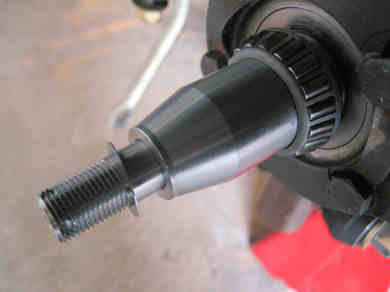
| Other then thickness, it all looks pretty
much the same at this point.....and those are my old bearings being used
for the picture taking session and explanation. |
 |
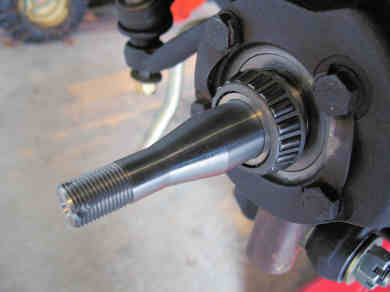 |
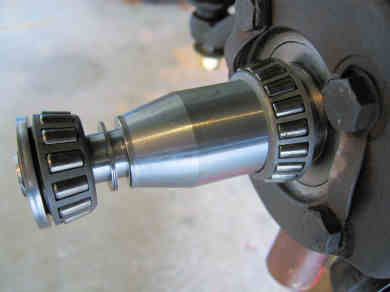
| Getting beefier with the spacer in place |
Now the cool part, adding these thin little shims
before the outer bearing goes on the axle |
 |
 |
| OK....imagination time. To show how this
works I couldn't include the actual hub in place or you wouldn't be able
to see how it all goes together. So just envision the hub spinning
between the inner and outer bearings. The idea here is to use the right
combination of shim sizes to allow the hub to spin freely when the
castle nut is cranked down to about 50 pounds on the old torque wrench.
If, after tightening, it doesn't spin....add another shim or a larger
shim. If it's too
loose, take away a shim or try a thinner one. Sooner or later you'll get
the right combination. |
 |
 |
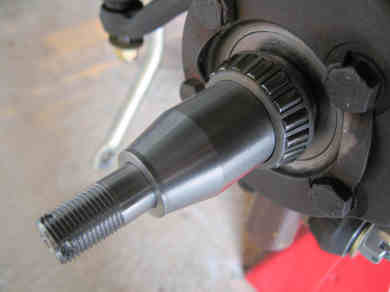
Now that you can visualize how it goes together inside the
hub, here's the step by step procedure that I used with much help from Uncle
Jack........he probably provided more tech support on this one sale then on all
his other sales combined!
-
Remove old stub axle .
-
Install new axle and tighten with supplied grade 8 nyloc
nut.
-
Slide inner bearing on to axle. If it's new, pack it with
grease. If it's old, I'd leave the old grease in it for now and re-pack it
later. DO NOT use the felt oil seal yet.
-
Slide spacer on to the axle. Make sure there's no grease
between the bearing and the edge of the spacer at both ends of spacer.
-
Put the hub on to the axle and up against the inner
bearing.
-
Slide a shim (start with .007) on to the axle.
-
Put the outer bearing on to the axle and in to the hub.
-
Install the "D" washer, castle nut and tighten to 50
pounds
-
Test for looseness, both side to side and up and down.
Make sure it still spins freely.
-
If it's too tight, go to thicker shims. Too loose, go
thinner
-
Once you've got the right shim combination, you can do
final assembly.
-
Even though I had new bearing with new grease in them, I
repacked them because they had been on and off the axle so much during the
fitting that they could have picked up some dirt.
-
Here's where I screwed up........I
installed the inner bearing and felt seal on to the hub and then realized it
wouldn't fit over the spacer! DUH........... so........ from the back of the
hub, drop the spacer in to the hub, then the inner bearing and lastly, the
felt seal. The felt goes to the outside of the hub toward the center of the
car. It should also be saturated with fresh oil. Mount this assembly on the
axle.
-
Slide your shim (s) on, followed by the outer bearing, "D"
washer & castle nut. Tighten to 40 - 50 pounds. Install the cotter pin &
grease cap. NOTE WELL:
the hub will not spin freely with the felt seal in place but, as long as you
got the shims correct without the seal, there will be no problem. Once your
tire is mounted, everything spins as it should.
-
Do the other side and you're good to go.
|


