|
|
| Good Parts.......Really Good
Parts! |
| Richard Good (www.goodparts.com)
makes a slew of great parts to make our cars
better. When I was researching what I'd need or
want for this project I narrowed it down to his
Nylatron Bushing Kit and his
Solid
Aluminum Steering Rack Mounts. The Nylatron
Kit that TRF sells is Richard's kit,S so you can
save $20 by ordering directly from Richard. The
same goes for the Steering Rack though the
savings is only $5. |
| Nylatron Bushing Kit |
| The Nylatron Kit is a
self-lubricating bushing which eliminates the
squeaks associated with poly bushings. I've only
driven the car about 10 miles in 50 degree
weather but I haven't noticed any squeaks yet.
The kit is extremely complete for rebuilding the
front end and includes: bushings and stainless
steel sleeves for the inner & outer, upper &
lower wishbones, new grade 8 pivot bolts,
washers and nuts and the rubber seal for the
trunnion. When assembling everything I used a
good coating of bearing grease on all the parts
per Richard's directions. I did have a local
fellow TR6 owner (Ivan Bailey) get me started
and loan me his spring compressor. With Ivan's
guidance on how to use the spring compressor and
identify the bushings I was able to move through
the project without too much difficulty. I only
screwed up once which isn't too bad considering
I had never done this before. Basically you
can't install the bushings first on the inner,
upper wishbones. There just isn't enough room to
slide the unit on to the upper fulcrum pins.
When I discovered this, I tried to remove the
bushing but only managed to break one of them. A
quick email to Richard and he mailed one out at
no charge....now that's great customer service.
The way I ended up installing that inner, upper
wishbone was to install the outside bushing in
to the arm along with the sleeve, then I
slide the inside bushing on to the fulcrum pin,
positioned the arm against that bushing and
tapped it all in to place. |
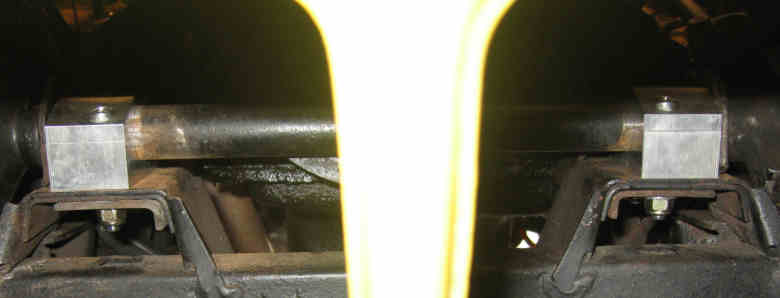
| Aluminum Steering Mounts |
I love
beautifully machined parts and the steering
mounts are pure quality. The installation is
pretty simple and I hope these pictures make it
even easier. I had the radiator out for a
professional cleaning so getting at the old
mounts and installing the new ones was easy.
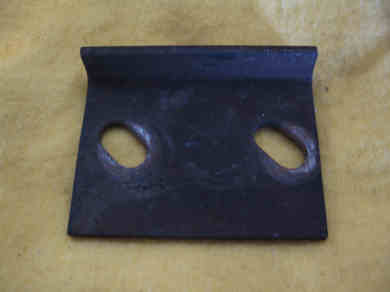
Just make sure you don't toss out that "J"
shaped bracket when you remove the old mounts.
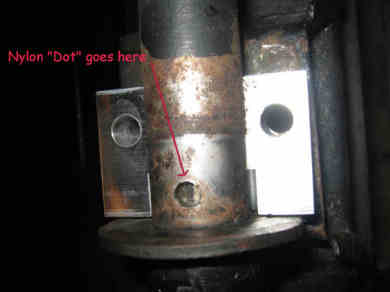
And.....three's a little nylon dot under the
right side mount that you'll need with the new
mounts. It's about the size of a worn down
pencil eraser. Don't lose it!
Some people complain that the solid mounts
transfer too much harshness back to the steering
wheel. In my limited driving, I haven't noticed
anything different, other then the whole front
end seems tighter since completing the rebuild.
Richard's products are definitely wroth the
price.
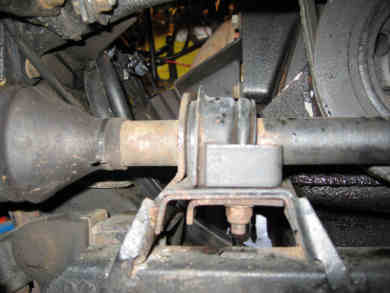
| Old Right Side Mount |
Don't Lose this Nylon
Dot on the Right Side |
 |
 |
| Don't Lose This
Bracket Either |
You Re-Use It Here |
 |
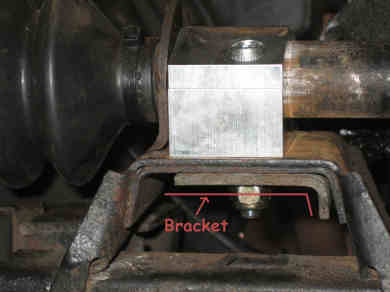 |
| Top View
of Installed Mount |
 |
| View of
Both of Them Installed.....Easy to See
with no Radiator in place. |
 |
|
| |
|
|
 |
|


